
 it_IT
it_ITGibson SG setup video tutorial:
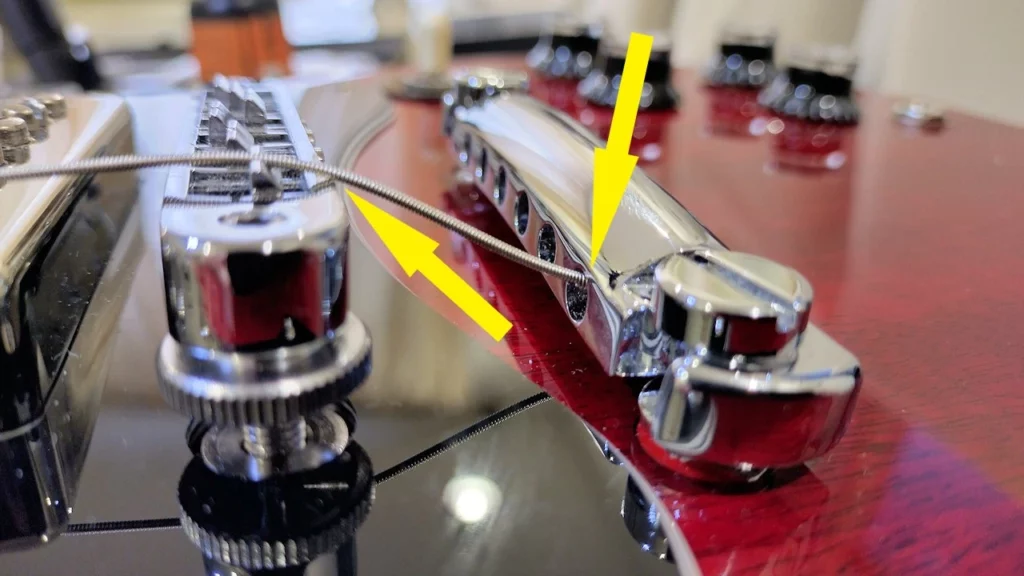
Tutorial on how to create the complete setup of the Gibson SG using the factory data and solving two typical problems of this guitar, that is, the fact that the strings, coming out of the stopbar, engage the edges of the stopbar itself and of the bridge, I will use this image to try to be more clear:
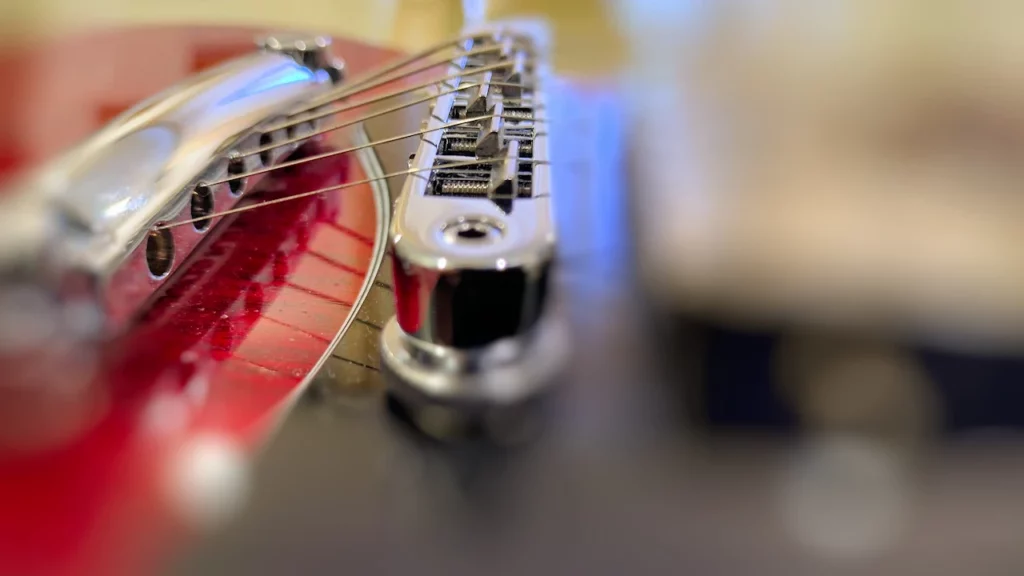
as you will notice the strings touch where they shouldn’t, the problem could be alleviated by raising the stopbar significantly:
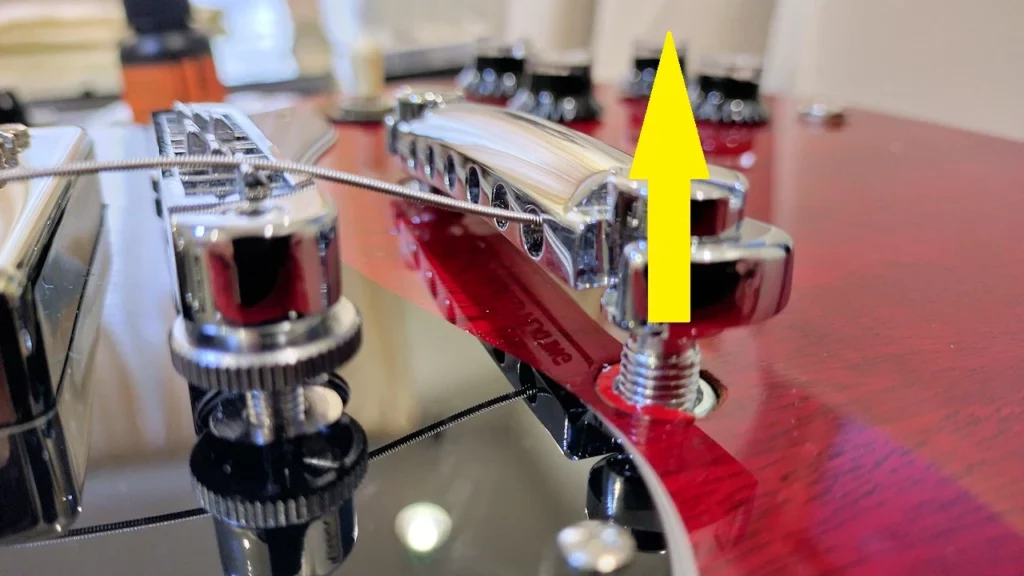
but this would lead the right hand to assume an unnatural position.
SOLUTION OF THE CONTACT BETWEEN THE STRINGS AND THE PICKUP AT THE BRIDGE, GIBSON SG SETUP:
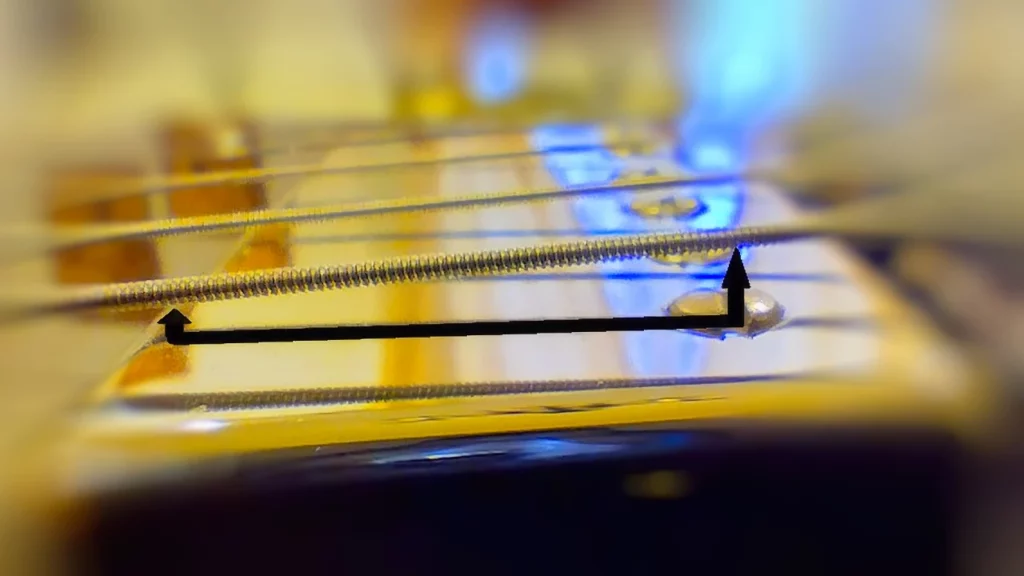
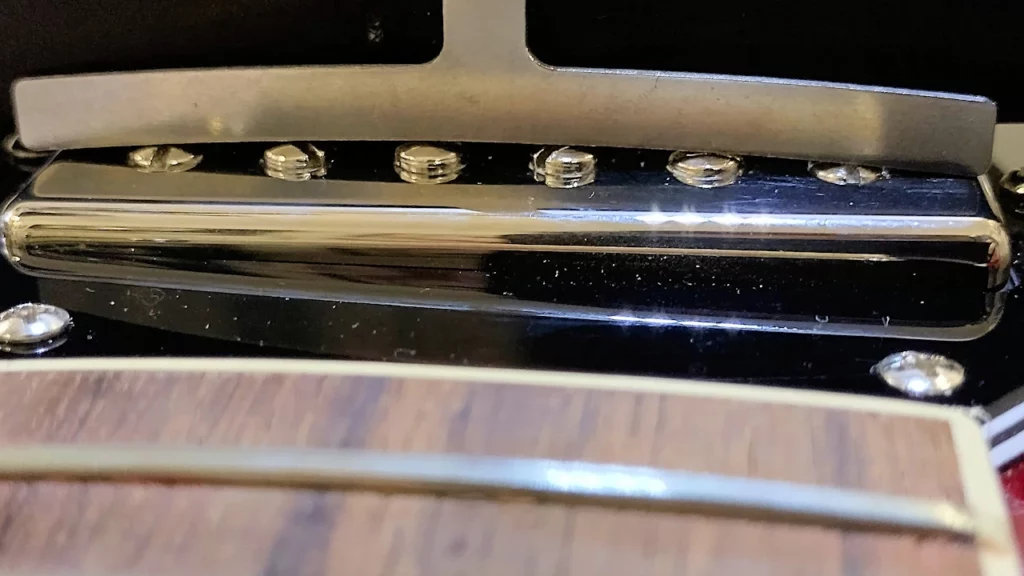
Another known problem, which we will resolve, concerns the bridge pickup. In practice, if we were to respect the dimensions that Gibson indicates as the distance to be measured between the magnetic pole and the string, the latter would rest on the front edge of the pickup mask with the effects that we can easily imagine, the image should clarify what I mean:
The execution of the setup and the simultaneous solution of the two problems exposed begins now:
By pressing the sixth string at the 22nd fret we lift the bridge pickup until the edge of the pickup mask touches the string itself, we repeat the same operation on the first string.
Still holding down the sixth string at the 22nd fret, this time we lift the relative magnetic pole just enough to make it touch the string, we repeat the same operation with the first string and the relative magnetic pole.
With this first adjustment we have eliminated the unfavorable angle that allowed the interference of the string on the edge of the bridge pickup.
ADJUSTMENT OF THE MAGNETIC POLES OF THE PICKUPS, GIBSON SG SETUP:
To adequately set the curvature of the magnetic poles, and therefore allow their progression to perfectly copy that of the strings, we will first have to free ourselves from the strings. If yours are new and you don’t think it is appropriate to change them, you can always postpone it until the next replacement. this adjustment.
If you decide to continue, you will need to obtain a caliper for measuring the radius, i.e. the radius of curvature of the keyboard. In the comments of the video uploaded to YouTube I have inserted the link for the purchase of a set of good quality caliper to a reasonable price.
Using the correct gauge, adjust the height of the magnetic poles, so that they all touch the reference curve, thus following its trend.
In the case of the bridge pickup only, the initial reference point will be determined by poles 1 and 6 which we have previously raised to eliminate interference with the strings; with the neck pickup, thanks to the favorable angle, it will be sufficient to leave the extreme poles to the height they already possess.
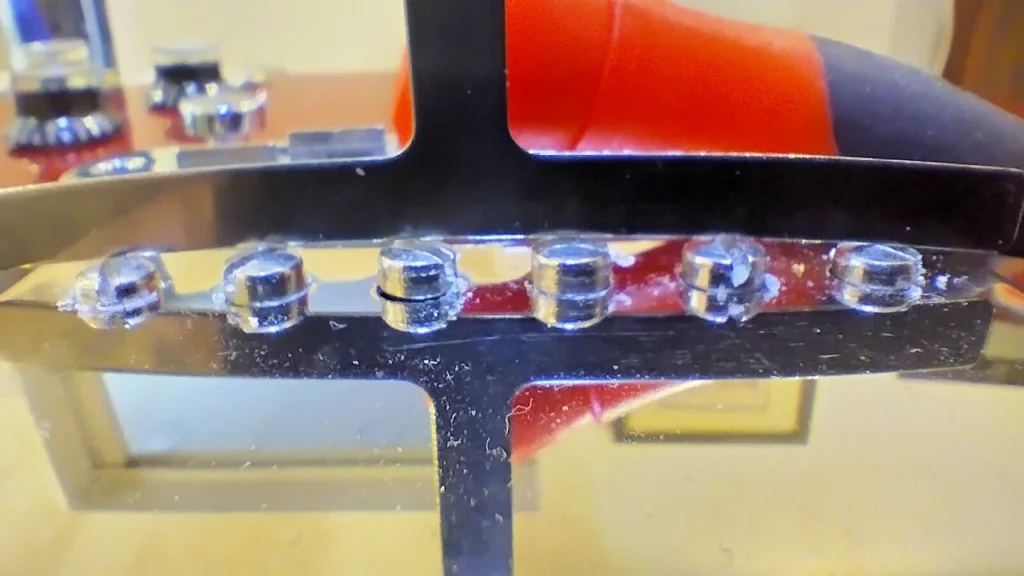
The following images show what the pickups will look like, respectively at the bridge and at the neck, once the adjustment has been made:
SOLUTION OF THE INTERFERENCE BETWEEN THE STRINGS, THE STOPBAR AND THE BRIDGE, GIBSON SG SETUP:
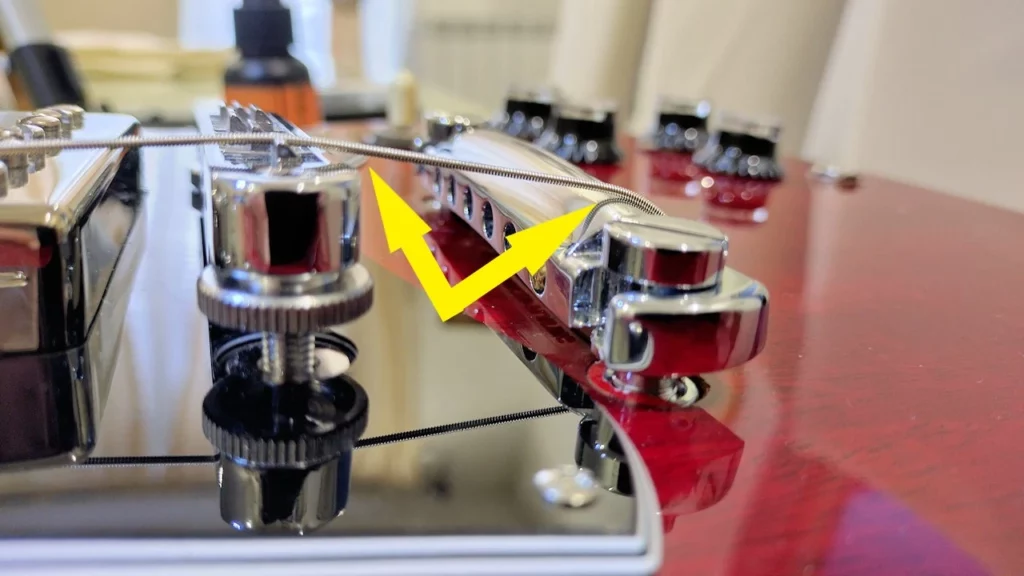
The ones shown below are the unwanted contact points between the strings, the stopbar and the bridge:
To restore the problem above, we will take advantage of replacing the strings, using the wrap around method will allow us to re-establish the correct attack angles between the affected components.
This is what they will look like once assembled:
Once the strings have been assembled, we will tune the guitar to move on to the next phase.
ADJUSTING THE NECK RELIEF, GIBSON SG SETUP:
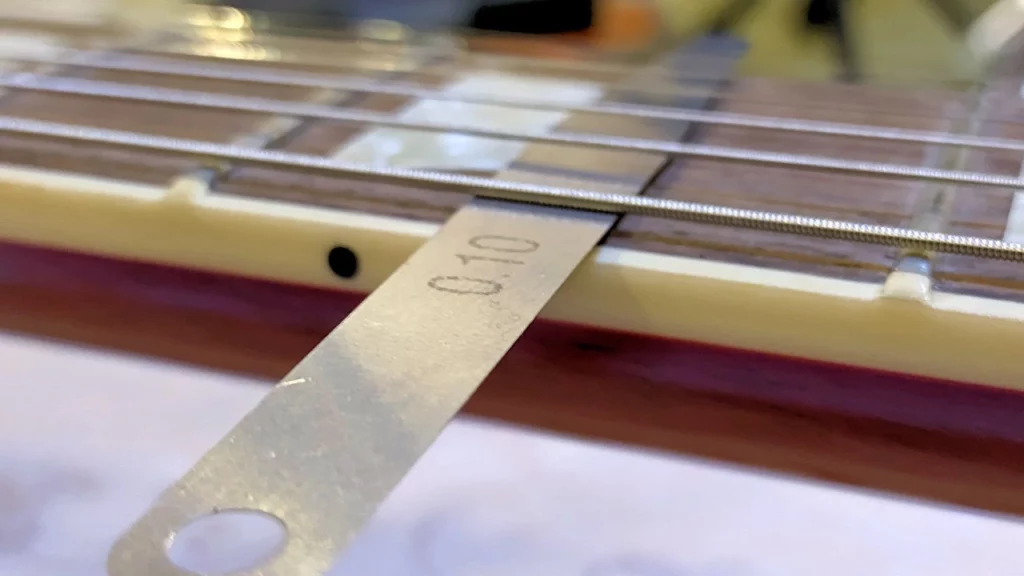
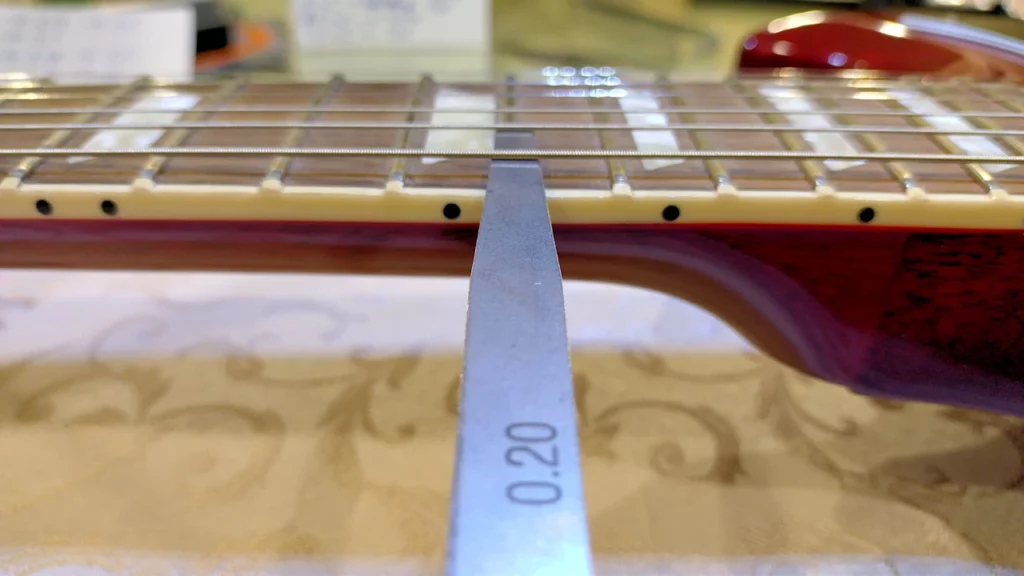
Once the strings have been assembled and the guitar has been tuned, we will continue with the Gibson SG setup, dealing with one of the settings that most impact our way of playing, I’m talking about the curvature of the neck. To obtain a valid measurement method we will need to use a feeler gauge. slats of a tenth of a millimetre, this is because while searching through the official documentation all I found, in relation to the measurement to be obtained, was the entry “no higher than the thickness of a sheet of paper” NO MORE THICKER THAN A PIECE OF PAPER , i.e. 0.004 inches which, translated into millimetres, means 10 cents, i.e. one tenth of a millimetre.
To detect the curvature we will place a capo on the first fret of the sixth string, of the low E so to speak, we will press the same string at the 15th fret and carry out the measurement between the top of the seventh fret and the lower surface of the sixth string.
If the measurement, as in my case, does not return the correct value we will need to act on the truss rod, that bar that passes entirely through the inside of the guitar neck whose purpose is precisely to act on the curvature of the neck.
We will then remove the protection plate placed on the headstock to have access to the adjustment nut, I talked about a nut but it could have been an Allen head or even a screw, it depends on the manufacturer’s choices, Gibson uses an inch nut and we will therefore need to use the tool they provide, with other brands it would have been possible to use standard tools.
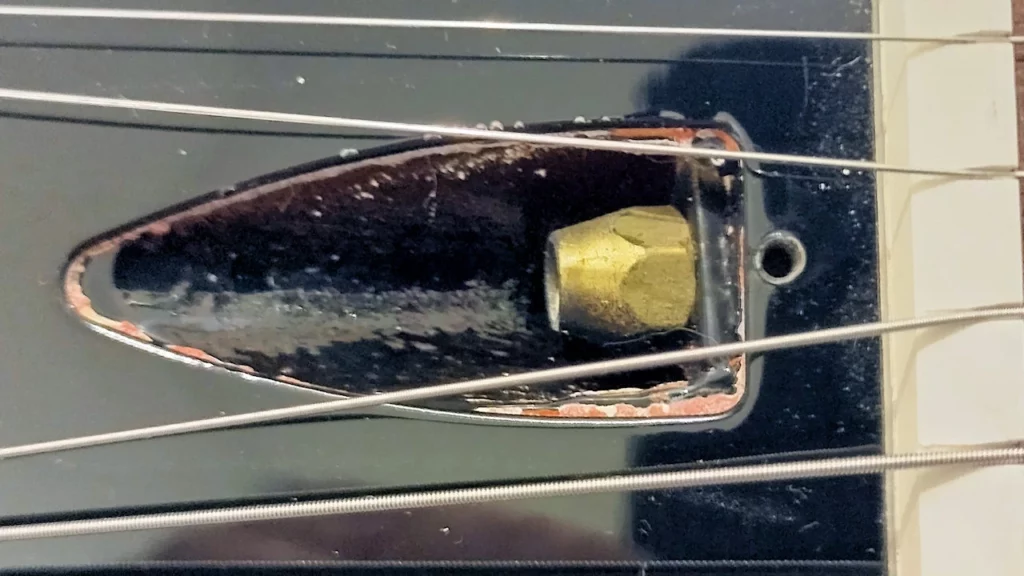
We will then act on the nut or screw until we reach the desired height on the sixth string at the height of the seventh fret. This adjustment will be particularly useful every time we decide to change the scaling of the strings or in the event of environmental variations in temperature or humidity.
At the end we will put the protection plate back in place and tune the guitar to move on to the next operation.
ACTION ADJUSTMENT, GIBSON SG SETUP:
The action is that thing that we would all like to be as low as possible, to improve the speed in key or chord changes, but with which we always clash because, if too low, we would end up frying the strings on the frets, but in In this case Gibson comes to our aid with the correct dimensions.
What we will need will be our trusty feeler gauge and the Allen key or screwdriver depending on the choice of the bridge builder, because it is precisely on the bridge that we will act to raise or lower the strings.
In case you don’t have the feeler gauge, I will put the Amazon link in the YouTube description to purchase a good quality one at a really low price.
The adjustment is carried out on the sixth and first strings, placing a capo on the first fret and bringing the value measured between the lower part of the affected string and the upper area of the 15th fret to 5/64″ of an inch respectively, equal to 2 mm , for the low E and 3/64″ of an inch approximated to 1.2 mm for the high E, we will then couple the blades of the feeler gauge so as to use the smallest number possible and placing the thinnest one in the center between the two thickest ones.
We will raise or lower the bridge until the feeler gauge gently rubs between the string and the fret.
This is probably the simplest of the adjustments but also the one that will give us the best feedback when we have made it.
Just one precaution to follow, every time we go to work on the bridge it will be a good idea to check the tuning of the guitar, this is to avoid that the increase or decrease in the tension of the strings leads to a change in the curvature of the neck.
CHECK NUTS HEIGHT, GIBSON SG SETUP:
Let’s now prepare the feeler gauge plates in the sizes 0.4 mm, 0.6 mm and 0.8 mm because we will check if the height of the nut is correct or if it needs intervention.
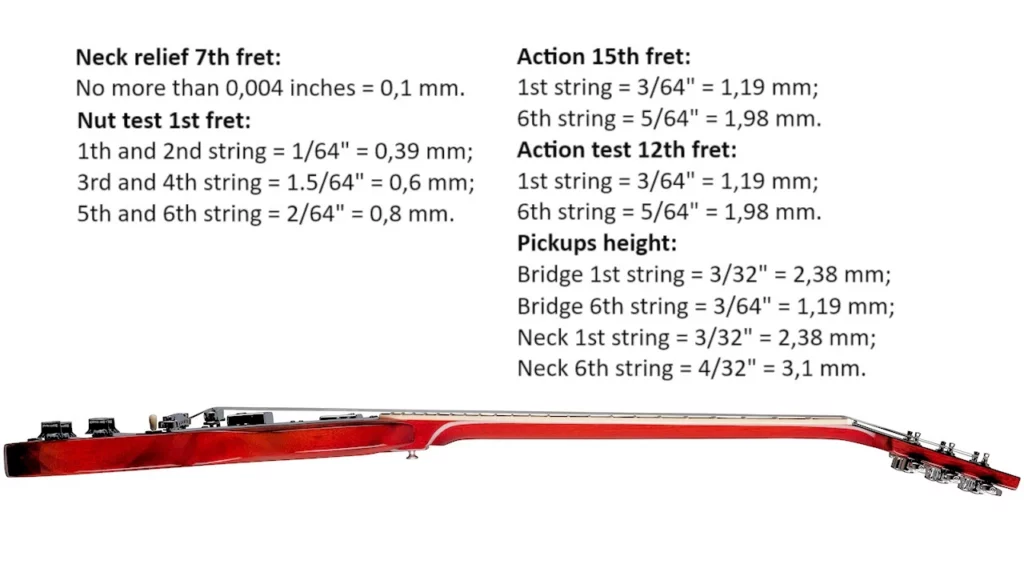
The measurement will be carried out with free strings and on the first fret, the correct measurements that we should obtain are the following: 1/64″ equal to 0.4 mm for the first and second strings, 1.5/64″ of an inch equal to 0.6 mm for the third and fourth string while the fifth and sixth string must return a value of 2/64″ equal to 0.8 mm.
In my case I only found the sixth string a little lower than expected, 2 tenths to be precise, so I won’t make any changes unless it interferes with the frets, in this case I will decide whether to replace the nut or whether to shim it to obtain the expected size.
At the moment, however, I don’t notice any rattling of the strings, so I think I’ll keep it that way.
CHECK NECK RELIEF, GIBSON SG SETUP:
To check that the setup is proceeding as it should, Gibson recommends that you now carry out a check on the neck.
The control consists in detecting the values that we previously obtained when we set the action, as you will remember we had adjusted the bridge in such a way that, with the first key pressed, the low E and E strings singing at the 15th fret reached a height respectively of 5/64″ i.e. 2 mm and 3/64″ equal to 1.2 mm.
If everything goes correctly, we should measure these same measurements, this time with free strings, on the 12th fret, so let’s equip ourselves with a feeler gauge and proceed with the check.
Taking into account that a ruler could also be used, with the parallax errors that it entails, let’s not worry too much if the measurements were to deviate by a few tenths, after all it would be the same error that we could make using an inappropriate measuring instrument .
I only found the low E, the sixth string, just a little lower, this is probably due to the nut which as you will remember on my guitar is missing two tenths in height, this did not cause me any problems and therefore it will be fine as is.
ADJUSTING THE DISTANCE OF PICKUPS FROM THE STRINGS, GIBSON SG SETUP:
We have reached the final stages of our setup, we will now adjust the distance of the pickups from the strings, without forgetting that thanks to the elimination of the interference between the magnetic poles and the edge of the mask that we created at the beginning, when we copied the radius of the keyboard on the poles, we will now be able to restore the correct string-pickup distance without worrying about the strings resting on the edge.
By now we know our lamella thickness gauge well and how to obtain the measurement thicknesses, so we will prepare it to continue our work.
We will act starting from the bridge pickup and pressing the sixth string at the 22nd fret, we adjust the distance between the top of the sixth pole and the low E to 3/64″ of an inch equal to 1.2 mm by working on the appropriate adjustment screw, by screwing it the pickup will rise, by unscrewing it it will move away from the string.
Still on the bridge pickup we will bring the high E pressed at the 22nd fret to 3/32″ of an inch, i.e. 2.4 mm from the relative magnetic pole.
Let’s now move on to the neck pickup, with the same methods as the bridge pickup we will bring the low E to 4/32″ i.e. 3.1 mm and the high E to 3/32″ of an inch i.e. 2.4 mm, the first string as you may have noticed it shares the same distance in both pickups.
TUNING, GIBSON SG SETUP:
We have finally reached the last of the adjustments of this setup of ours, but in the end we will now have to deal with the setting that requires the most patience of all those we have already performed, it is basically a matter of tuning the guitar.
Tuning the guitar means that, for each string, when a particular fret is pressed, the note that will be generated must follow the expected progression without it decreasing or increasing.
What we will need is a good tuner, a screwdriver and a nut, together with a little patience as I anticipated.
We will act first by tuning the guitar and then placing a capo at the 12th fret, the note we will look for will be the same as the string we are playing open plus an octave, so if we are playing the low E string, at the 12th fret we will have to obtain the same note and if this does not happen we will have to act on the saddles placed on the bridge, bringing them closer to the nut if the note is flat, moving them further away if it is rising.
The difficulty lies in the fact that every time we operate the saddles, each time, we will have to remove the nut, re-tune the open string, put the nut back in position and check, at this point, whether the adjustment has been successful, otherwise we will have to repeat the procedure. procedure as many times as necessary to obtain the desired result.
It is possible that in guitars that are particularly tired over the years, or built with little care, we will not be able to perfectly tune one or more strings because the saddles will reach their end point first. In this case, patience, we will be content to reach the closest possible value without make a tragedy of it, unless the difference is not of an entire tone, in this case we will really have to worry, but if only a fraction of a tone is missing it means that we will make a virtue of necessity.
Some recommendations in addition to that, I will never tire of repeating, to re-tune the open string every time we operate the saddle.
First, perform the intonation procedure with as much of the neck surface as possible resting on a soft support or the leverage it develops will end up distorting the setting.
Second, carry out all the steps twice, especially if you have worked a lot on the saddles, because the strength of the single string is linked to all the others and therefore there is always an interaction between the forces in play.
I’ll leave you with the setup on the video, because images often help more than words, however I remain on the YouTube channel available to anyone who has questions or needs clarification.
I hope I have been of help to you with the Gibson SG setup, if you wish to delve deeper into the topic, know that here on the site and on my YouTube channel you will find a dedicated section.
Salvo